Process design and optimization
The change in the automotive industry and the targeted reduction of CO2 emissions, e.g. in aviation, pose new challenges for grinding technology [BERG19]. In addition to the fine machining of hardened steel components for internal combustion engines in high volumes, the machining of thin-walled lightweight components and the machining of high-temperature materials, for example, is gaining in importance. The tools required for their machining, e.g. milling cutters made of wear-resistant carbide, are also produced by grinding [WIRT18].
This opens up new fields of application in which the principle-related advantages of centerless grinding can be utilized.
For example, deflection of thin-walled or slender lightweight components is avoided during centerless grinding due to the line contact of the workpiece to the support rail and regulating wheel, thus enabling their productive machining at high metal removal rates. Milling cutter blanks are positioned in the grinding gap and machined with high precision without complex clamping and handling systems due to the three-point bearing, since the diameter-related error in centerless grinding is only half as large as in grinding between centers.
As shown in Figure 1, the infeed for centerless grinding is twice that of grinding between centers to realize the identical diameter change. [KLOC17]

The circular form deviation during centerless grinding
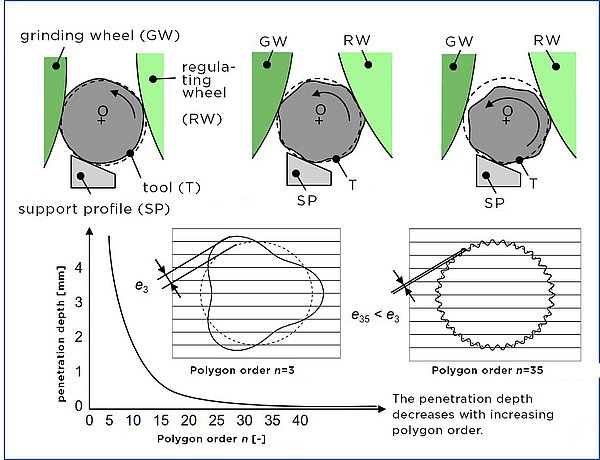
However, since as a result of the three-point bearing the workpiece is simultaneously supported and machined on its circumferential surface, a continuous displacement of the center of the workpiece occurs. As a result, the penetration depth e of the grinding wheel varies and centerless ground components have a polygon shape that deviates from the ideal circular shape.
The generation of the circular shape deviation and the present polygon order n during centerless grinding is determined by the geometrical arrangement in the grinding gap, i.e. by the position of the support rail, grinding wheel and regulating wheel as a function of the grinding wheel diameter, the workpiece diameter and the regulating wheel diameter. The aim is to achieve high polygon orders n, which generate smaller circular form deviations fk due to the lower engagement depth e of the grinding wheel, as shown in Figure 2.
Unfavorable setting variables lead to the fact that the circular form deviation fk is increased with each workpiece revolution [REEK67].
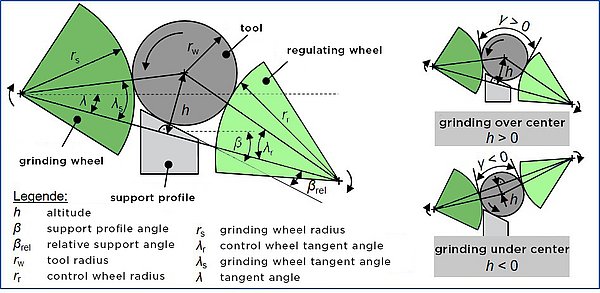
The height position h is the distance between the straight line connecting the grinding and regulating wheel and the center of the workpiece and is one of the most important parameters for describing the grinding gap geometry. Figure 3 shows the height position h for a grinding gap arrangement with lowered regulating wheel. If the workpiece center is above the connecting straight line, the height position h > 0. In this case, we speak of grinding above center. When grinding below center, the height position h < 0. Although the workpiece cannot jump upwards out of the grinding gap if it is accelerated too much by the grinding wheel, the process stability is negatively influenced in most cases [KLOC17].
Identification of an optimized grinding gap geometry
To calculate a suitable grinding gap geometry, a software tool was programmed at the Machine Tool Laboratory WZL of RWTH Aachen University in the EU-funded research project CEGRIS [ALTE08]. This tool was further developed by the company Grindaix. In the software tool, the relative contact angle βrel, which is given by the design of the support rail, the grinding wheel - ds, workpiece - dw and control wheel diameter rR as well as the start height position hstart are specified as input variables. From the given values, the contact angles between the contact points between grinding wheel and workpiece as well as workpiece and support rail φ1 and the contact angle between the contact points between grinding wheel and workpiece as well as workpiece and control wheel φ2 are calculated. The stability index SI is determined for the contact angles. This provides information on whether a polygon of a certain order builds up or degrades during machining. The software creates a stability map for the entered process parameters as shown in Figure 4.
![Grindaix GmbH_Figure 4: Stability map for process setting [WZL] Stability map for process setting](https://grindaix.de/fileadmin/_processed_/3/5/csm_Grindaix-GmbH-Abb4-Prozesseinstellung-en_4ada2fc1a1.jpg)
The red crosshairs indicate the position of the current process parameters in the stability map. The colors in the stability map are used to read off the polygon order n and the stability index. The aim is to achieve positive values for the stability index (stable range) with the highest possible polygon order. If the selected input variables are in the unstable range, the crosshairs are moved parallel to the drawn green straight lines into the stable range with high polygon order n. The software calculates a new height h, while all other parameters remain constant. If the crosshairs are moved horizontally and thus parallel to the black lines, a new relative contact angle βrel is calculated. Since the relative support angle βrel is usually given by design, in practice an adjustment of the elevation h is performed to achieve the calculated geometric characteristics.
Other features of the simulation tool include a calculation of the center displacement of the component for large stock allowances to compensate for the resulting diameter deviation, as well as an estimation of the forces in the grinding gap. Support in determining an optimized grinding gap geometry is offered by the WZL machine tool laboratory at RWTH Aachen University as a service for industrial users.
Process kinematics
In centerless plunge-cut grinding, the cutting on the component diameter is in most cases performed by the radial infeed of the grinding wheel in the direction of the workpiece. The engagement paths of the abrasive grains are thus comparable to external cylindrical cross grinding between centers. The diameter change in centerless through-feed grinding is achieved by the conical arrangement of the grinding gap, through which the workpiece is conveyed in the axial direction as a result of the inclined regulating wheel. Due to the existing relative speed between the workpiece and the grinding wheel in the axial direction, the engagement situation is comparable to external circumferential longitudinal grinding. To achieve optimum chip formation by the grain cutting edges of the grinding wheel, a defined relative speed between the grinding wheel and the workpiece must be ensured. Centerless grinding processes are designed in such a way that chip thicknesses are comparable to those of cylindrical grinding. Due to the analogy with external cylindrical grinding, the desired values for the speed ratio between the grinding wheel and the workpiece lie between centers in an identical range of qs = 60 - 120. Higher values increase the risk of grinding burns, while lower values pose the risk of chatter marks. Depending on the set grinding wheel peripheral speed, the workpiece peripheral speed is calculated for the selected speed ratio [CONR08]. In order to keep this constant during grinding, the regulating wheel must be driven at the identical circumferential speed, but at a lower speed due to the larger diameter. To ensure that the workpiece is not accelerated during contact with the grinding wheel, the contact ratios between the workpiece and the regulating wheel must be set correctly.
The contact between workpiece and regulating wheel
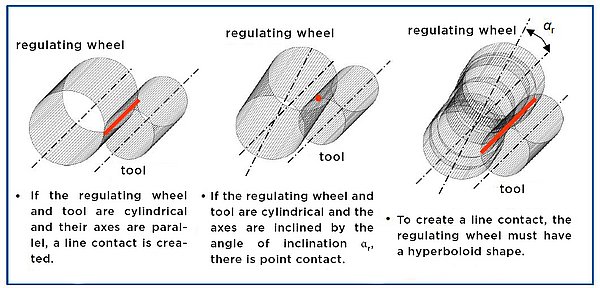
The dressing process of the regulating wheel influences the friction contact between the workpiece and regulating wheel. If the coefficient of friction between the workpiece and the regulating wheel is too low, the workpiece can be accelerated by the grinding wheel. The friction coefficient between the workpiece and the regulating wheel is also influenced by the specification of the regulating wheel. Ceramic-bonded regulating wheels generally have a lower coefficient of friction than resin-bonded regulating wheels [MEYE16]. If the highest possible coefficients of friction are to be achieved, rubber-bonded variable speed pulleys are often used. An incorrect supply of cooling lubricant to the contact zone can have a negative effect on the rolling motion between the workpiece and the regulating wheel. In order to ensure a line contact along the entire workpiece width despite the inclined position of the regulating wheel for realizing the axial force, the regulating wheel must have the shape of a hyperboloid after dressing, see Figure 5 [OTTO14]. Correct dressing of the regulating wheel is therefore of utmost importance for process stability. On older machines, manually adjusted dressing rulers are still used, while on modern centerless grinding machines the shape of the regulating wheel is produced by a CNC-controlled dressing process.
Process design and optimization
Compared to cylindrical grinding between centers, there are more influencing variables that have to be taken into account and specifically adjusted in order to make use of the principle-related advantages of centerless grinding. This complicates the process design and makes the optimization of existing processes very complex. Only a holistic view of the grinding gap geometry, the process kinematics, the tool specification, the dressing processes for grinding and regulating wheel as well as the cooling lubricant supply will lead to sustainable success.
Centerless grinding processes are often designed in practice by the trail-and-error method, and the adjustment variables found are often frozen for years. In order to design or optimize centerless grinding processes in a knowledge-based manner without time-consuming and costly preliminary tests, the relationships between the numerous setting variables in centerless grinding and the process result must be known.
The cause-effect relationships between the process input variables and the workpiece properties during centerless grinding have been the focus of research work at the Machine Tool Laboratory WZL at RWTH Aachen University since the 1960s. With this wealth of experience, optimized centerless grinding strategies are developed with the customer for a wide range of applications. Together with the Grindaix company, which optimally adapts the cooling lubricant supply to the machining task and provides the necessary sensor equipment for metrological monitoring of the cooling lubricant flows, the Machine Tool Laboratory WZL of RWTH Aachen University offers holistic consulting for the redesign and optimization of centerless grinding processes. Holistically optimized grinding processes save costs, increase productivity and protect the environment.
April 22, 2021
Sources
ALTE08: Altermann, G., CEGRIS II Publishable Executive Summary, CORDIS Data-base, 12/2008
CONR08: Conrad, K.; Stoll, S.; Otto, K.: Leitfaden spitzenloses Außenrundschleifen. Leipzig, Schleifring Service Mikrosa, 2008
KLOC17: Klocke, F.: Fertigungsverfahren 2. Schleifen, Honen, Läppen. 5: Springer Vie-weg, 2017
MEYE10: Meyer, B.: Prozesskräfte und Werkstückgeschwindigkeiten beim Spitzenlos-schleifen. Dissertation. RWTH Aachen, 2010
OTTO14: Otto, K.: Spitzenlose Außenrundschleifmaschinen. In: Heisel, U., Klocke, F., Uhlmann, E., Spur, G.: Handbuch Spanen. Carl Hanser Verlag, München, 2014
REEK67: Reeka, D.: Über den Zusammenhang zwischen Schleifspaltgeometrie und Rundheitsfehler beim Spitzenlosen Schleifen. Dissertation RWTH Aachen, 1967
WIRT18: Wirtz, Christian: Zerspanverhalten von WC-Co Hartmetallen. Dissertation. RWTH Aachen, 2018
Products relevant to this article:
You may also be interested in these articles from our magazine:
Zero Emission Production

Zero Emission Production helps to sustainably reduce carbon dioxide emissions while increasing the availability of production equipment and avoiding the waste of operating materials.
GRX-Q - Magnetic-inductive flow measurement
In magnetic-inductive flow measurement (MID), an electrical voltage is generated by the interaction between the flow velocity of a liquid and a magnetic field. This principle is based on Faraday's law of induction.
Coolant supply for centerless grinding
Among the cylindrical grinding processes, centerless processes occupy a special position in terms of their process structure and area of application.

